
250x250
Notice
Recent Posts
Recent Comments
Link
| 일 | 월 | 화 | 수 | 목 | 금 | 토 |
|---|---|---|---|---|---|---|
| 1 | 2 | 3 | 4 | 5 | ||
| 6 | 7 | 8 | 9 | 10 | 11 | 12 |
| 13 | 14 | 15 | 16 | 17 | 18 | 19 |
| 20 | 21 | 22 | 23 | 24 | 25 | 26 |
| 27 | 28 | 29 | 30 |
Tags
- DevOps
- stream api
- 자동빌드
- JQuery
- ORM
- Javascript
- jqGrid
- apache.poi
- rabbitmq
- Jenkins
- 보안
- JPA
- 대용량 업로드
- 그리드
- 제이쿼리그리드
- Stream
- spring
- 자바8
- mom
- ci/cd
- 스트림
- MessageQueue
- 자동배포
- poi
- sqlserver
- docker
- QueryDSL
- java
- 엑셀 업로드
- mssql
Archives
- Today
- Total
개발 메모장
[MOM] RabbitMQ(4) - Consumer 예제 본문
728x90
#. application.yml
- Queue의 이름만 알면 별도로 프로퍼티로 추가해줄 필요는 없지만 편의상 추가한 것이니 참고바랍니다.
server:
  port: 8033

rabbitmq:
  queue:
    name: sample-queue
#. Configuration
- Consumer에선 메시지를 받고 변환하는 Bean을 생성해주어야 합니다.
- Producer에서 RabbitMQ과 연결 및 컨버팅 작업을 해주는 Bean인 RabbitTemplate과 동일합니다.
@Configuration
public class RabbitMqConsumerConfig {

	@Bean
	public RabbitTemplate rabbitTemplate(ConnectionFactory connectionFactory) {
		RabbitTemplate rabbitTemplate = new RabbitTemplate(connectionFactory);
		rabbitTemplate.setMessageConverter(jackson2JsonMessageConverter());
		return rabbitTemplate;
	}

	@Bean
	public MessageConverter jackson2JsonMessageConverter() {
		return new Jackson2JsonMessageConverter();
	}
}
#. DTO
- Producer에서 보낸 메시지를 수신하기 위해 동일한 DTO를 만들어 줍니다.
@Data
public class MessageDTO {

	private String title;
	private String content;
}
#. Service
- Consumer에선 별도 http 접근을 하지 않아도 되기에 Service를 통해 직접 전달 받을 수 있도록 하였습니다.
- 여기선 RabbitMQ의 Queue에서 전달받을 수 있도록 어노테이션을 붙여주고 구독할 Queue 이름을 붙여줍니다.
@Service
public class RabbitMqConsumerService {
@RabbitListener(queues = "${rabbitmq.queue.name}")
public void receivedMessage(MessageDTO dto) {
System.out.println("================ Receieved Message : " + dto.toString());
}
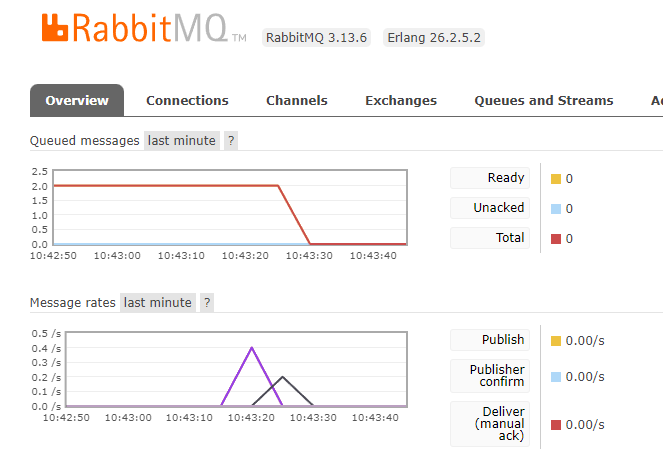
}#. Queue 확인
- 위와 같이 Consumer를 생성하고 서비스를 기동하면 Consumer로 메시지가 전달됩니다.

- Producer의 RabbitMQ UI에서 상태를 다시 확인해봅니다.
- 쌓였던 메시지가 Consumer에 순서대로 넘어오게 되면서 Ready의 숫자가 0으로 변하는 것을 볼 수 있습니다.
- 메시지의 갯수가 줄어들면서 그래프가 꺽인걸 확인할 수 있습니다.
#. 이렇게 Direct Exchange를 통한 메시지 송신 및 수신에 대해 알아보았습니다.
#. 비지니스 로직을 통해 수신 받은 데이터를 처리할 수도 있으니 적절하게 적용하여 사용하면 좋을 것 같습니다.
===========================================================
틀린 내용이 있거나 이견 있으시면 언제든 가감 없이 말씀 부탁드립니다!
===========================================================
728x90
'MOM' 카테고리의 다른 글
| [MOM] RabbitMQ(3) - Producer 예제 (0) | 2024.08.21 |
|---|---|
| [MOM] RabbitMQ(2) - 정의 (0) | 2024.08.20 |
| [MOM] RabbitMQ(1) - 도커 설치 (0) | 2024.08.19 |
'MOM' Related Articles
more


